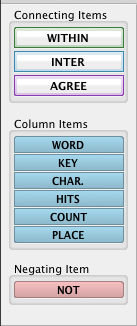
The Simple Construct Palette
 Using items from the Simple Construct palette is the first step in building a Simple construct. This graphic shows the Construct palette for a Simple construct.
- The Simple Construct palette has three areas:
- The top area contains Connecting items, used to specify relationships between construct elements.
- The middle area contains Construct Elements, used to specify the word, grammar, and other details of the words/phrases you are looking for.
- The bottom area contains the NOT item, used to negate an element, a grammatical tag in an element, or all elements in a column.
- Add an item by dragging it from the palette to the desired location. This places the item in your construct and brings up an appropriate dialog box (if further information is required).
- Move items by dragging them (when the cursor changes to a two-headed arrow).
- Select items by clicking on them (when the cursor changes to a two-headed arrow), or select two or more objects by Shiftclicking or drawing a box around them. Selected items can be deleted or dragged.
- Duplicate objects by holding down Alt+ while dragging (a + sign is added to the hand icon).
- Copy a selected object or group to another Construct tab of the same type by dragging it to the new tab.
- Edit objects by double-clicking on them to reopen the dialog box, or click in the text to edit it directly.
The above applies to the Greek and Hebrew Construct Palettes as well; however, additional items are available in the Construct Elements area. If the Syntax databases are installed, additional areas are available under the NOT item area.