Perform a Simple Construct Search
To perform a simple construct search:
- Open a Construct tab and make sure it is linked to a Search tab
 The core tab used to search Bible texts, it consists of a search entry area and a search results area.
 - In the Construct tab, proceed as follows:
- Place Element items in columns to define each word in the phrase.
- Drag Connecting items into the connecting area above the desired element columns.
- The Connecting item automatically attaches to the nearest element columns with two arcs. Drag the square handles on the arcs to connect to another column.
- Change the size of the Connection area by dragging the heavy line between it and the Element columns.
- When satisfied with the graphical construct, click Search at the top of the Construct tab. The results are viewed in the linked Search tab.
If the tab is not correctly linked, a message advises you of the error.
For more information on adding Element Items and Connecting Items, click one of the expanding links below.
-
 Combining Items
- More than one Element item can be placed in the same column.
- Each item can appear only once in a column, but any combination of WORD, KEY, and PLACE can be used to define an element.
- The resulting "hit" word in the search text must match each item in the column, although alternative details can be specified within an item.
 When a WORD or KEY item is dragged into a column, the Select Words or Select Key Numbers dialog box appears. These dialog boxes are used to select one or more words or key number that occurs in the text.
- You can also enter the word or key number manually into the Element item.
- For constructs for grammatically tagged texts, the WORD item is replaced by the LEX, INFLECT, and ROOT items.
- These constructs also include parts of speech items appropriate for each text.
- If the Syntactical databases are installed, additional Element items appear under the NOT item.
These items are equivalent to the Character symbol, the HITS command, and the COUNT command when creating a search argument in the Search Entry box. Dialog boxes appear for entering a character, or to define the HITS or COUNT command parameters.
COUNT only: An initial value of "1" is entered in the first box; this value is remembered when editing. If desired, the value can be changed.
 Use the PLACE item to specify what position in the search field an element must occupy.
- Example: If the search field is Sentence, a PLACE of 2 means that this element must be the second word in the sentence in order to meet the search criteria.
-
Enter a number in each box to specify a range of positions within the search field where the element must be found. A value is automatically entered in the first box but you can change that value.
An initial value of "1" is entered in the first box; this value is remembered when editing. If desired, the value can be changed.
- The NOT palette item is used to negate other items.
-
Drag NOT over an item to negate the entire item; a diagonal slash appears over the item.
Example: The NOT item can be applied to the PLACE item to specify a location or range where the element cannot appear in the search field.
- To remove the NOT item, drag another NOT item onto the same element.
 To negate the entire column, place the NOT item over the top element item in the column. This means you do not want that element to appear in this position of the construct. There are limitations on the use of the connecting items with a negative column.
This example shows a search for the word King which is not tagged with specific Key Numbers, and which occurs within 10 words of the beginning of the verse (or field).
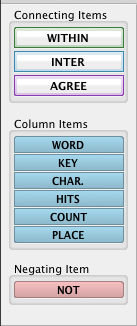
 Connecting items are placed by dragging them into a position above the desired element columns. They are the same for all constructs (Simple, Hebrew, and Greek).
- Constructs with more than one column always search for a phrase. If no WITHIN item is used, any number of words can intervene between each column.
- The WITHIN element is used to limit the number of words intervening between columns. It specifies the maximum separation between two elements.
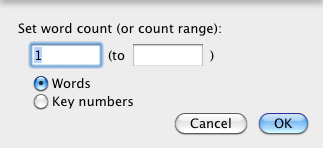
- An initial value of "1" is entered in the first box; this value is remembered when editing. If desired, the value can be changed to a higher value. (A value of "0" is not allowed.)
- To specify adjacent words, use WITHIN with a setting of 1.
- WITHIN with a value of 2 specifies that the elements are no more than two words apart (0 or 1 intervening words).
- A WITHIN range of 3-5 specifies that 2-4 other words must intervene between the elements.
-
 The WITHIN item affects the intervening columns beneath the arcs.
 - Drag the squares on the arcs to change which columns are affected by the WITHIN item.
- These intervening elements can occur anywhere in the range of words.
- To specify that intervening elements are adjacent, use another WITHIN with a setting of 1 to connect them.
- Use the NOT item with the WITHIN item to specify a range where the elements cannot be found.
-
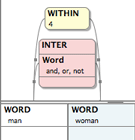 INTER is used to specify words that may occur between elements in the columns. You can use any of the element items to define the words in the same way as an element column.
 - INTER limits any words that occur between two elements to those that match the criteria defined in the INTER.
- The INTER item also affects the intervening columns beneath the arcs.
- The INTER item cannot be used with negative columns.
-
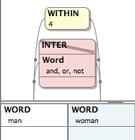 The NOT item can be used to negate an entire INTER item, or to negate aspects of the definition of the intervening words (except the top item). This specifies what words may not occur between those two elements.
 -
Example: This positive INTER finds cases where man and woman are adjacent, or separated only by "and," "not," or "or."
This negative INTER finds cases where man and woman are adjacent, or separated only by any words except for "and," "nor," or "or."
- AGREE is used to specify that certain details of two elements must match. In Keyed Bible texts the details available are Word and Key Number.
- AGREE can be used together with NOT to specify that the details must not match.
-
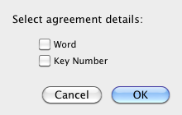 When dragging the AGREE item into the connection area, the Select agreement dialog box opens and you can select one or more of the details.
 - The Select agreement dialog box offers additional options for Greek and Hebrew constructs.
- The two elements connected by AGREE item arcs must agree for each detail selected in the dialog box. When you close the dialog box, the selected details appear as text within the AGREE item.
- The NOT item can be used with the AGREE item to specify the details in which the connected elements cannot agree.
- If there is more than one detail in the item, the linked elements are excluded from the search results only if they agree on both details.
- If the elements agree in word but not in number, or vice versa, they are included in the search results.
- Separate AGREE items are used to specify that two elements must not agree in word and also must not agree in Key Number.
The WITHIN and AGREE connecting commands can be used with a negative element column with certain limitations:
- The negative column is defined like a positive column, with a NOT over the top element item.
- INTER cannot connect to a negative column.
- If the negative column is not the first or last column, it must be enclosed by a WITHIN item.
- The negative column can be connected only to one adjacent positive column by WITHIN and AGREE items.
- Only a positive WITHIN can connect to a negative column.
- Both AGREE and NOT AGREE items can connect to a negative column.
These limitations apply to all types of Constructs (Simple, Hebrew, and Greek).