Customize Item Layers
The Define Item Layers option is used to modify a current layer or create a new one, using the standard list of items and selecting the items to be displayed by their class and date range. However, to truly customize an Item Layer, you should define User Items and Custom Lists.
When you Define User Items, you create items with names or dates that differ from those already supplied. These can then be added to a Custom List.
When you Define Custom Lists, you create lists of individual items that can be displayed on an Item Layer. You can use items from the list supplied with the Timeline, or the User Items that were defined via the Define User Items dialog box.
-
From the Items pop-up menu, choose Define User Items. The Define User Items dialog box appears.
- Click New button to create a new User Item. [New name] is added to the list of User Items and the Name box.
- To remove the new item click Delete.
- You can also select and edit an existing User Item, or click Duplicate to make a copy of a User Item and edit the copy.
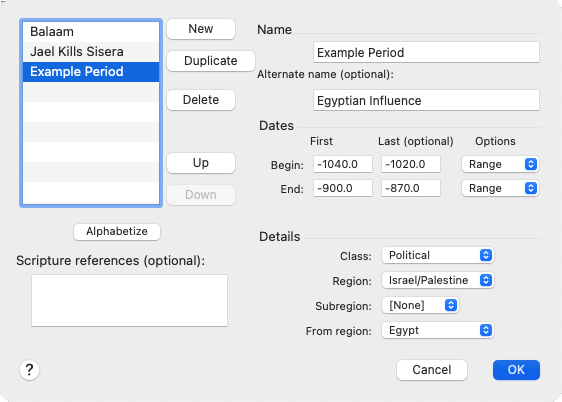
- In the Name box, enter a name for the item, and an alternate name if desired.
- Define the User Item details as follows:
-
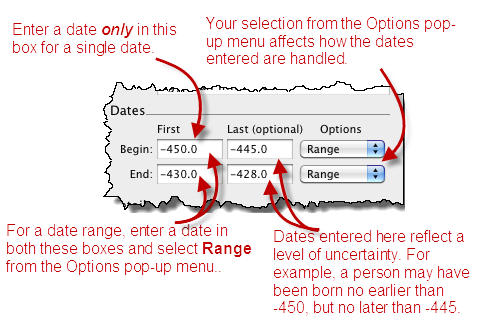
Enter the dates for the User Item in the Dates area, as shown below.

- Define the Details for the User Item.
- The Class pop-up menu is used to choose the User Item class. This setting affects how the User Item is used in the Item Layer. If Political is selected, you can define a new political period.
- The Region pop-up menu is used to choose the region in which the new User Item is to appear.
- The Subregion pop-up menu is used to assign the User Item to a specific horizontal band within the region. You can choose up to four subregions, and you may wish to create political periods to identify the subregion.
- The From region pop-up menu is dimmed unless the Political class is chosen. Use this option to show that the major influence in this period comes from another region. The period is colored with that region's color, if Use region colors is selected in the Define Region Layer dialog box.
- Click OK to save your changes.
|
|
Hint You could create a series of kings in the same region by making several duplicate User Items and then changing just the name and dates for each one. |
|
|
Notes
|
-
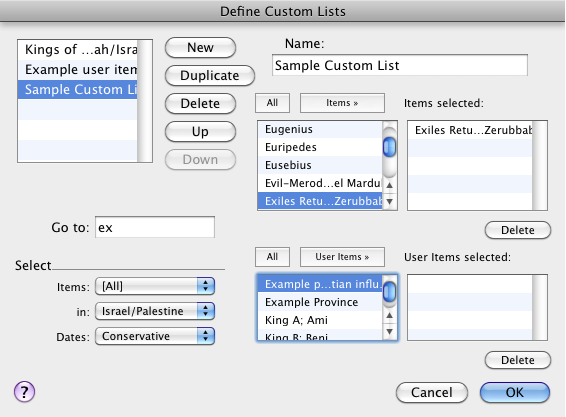
From the Items pop-up menu, choose Define Custom Lists. The Define Custom Lists dialog box appears.
- Click New to create a new item layer. [New name] is added to the list and the Name box.
To remove the new list click Delete. - In the Name box, enter a name for the Custom List.
-
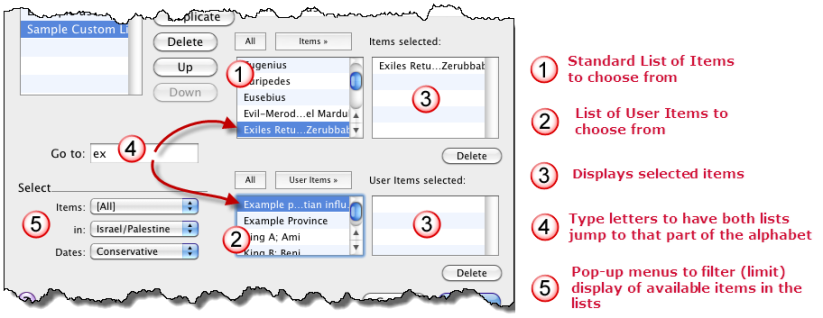
Select and add items to the Items selected and User items selected areas, as shown below.

- Click OK. The Custom List is saved.
|
|
Hint If items on the Custom List are not displayed, even after choosing the List in the current Item Layer, check the Time Range of the Item layer, and displayed regions in the current Region Layer. If your Custom List items are outside either of these ranges, they will not appear. |
- Define an Item Layer to display the items included in your Custom List.
|
|
Hint You could set the display of markers for all classes of items, then duplicate the layer and hide some classes, or use a Custom List without having to reset all the display options. |


