Define Item Layers Dialog Box
Prerequisites for use: A Timeline tab is the active![]() The application, window, tab, or other screen element which is currently being used; sometimes called the "front" or "frontmost" screen element tab.
The application, window, tab, or other screen element which is currently being used; sometimes called the "front" or "frontmost" screen element tab.
Use: The Define Item Layers dialog box is used to edit or create new classes of items and set the display characteristics of each class.
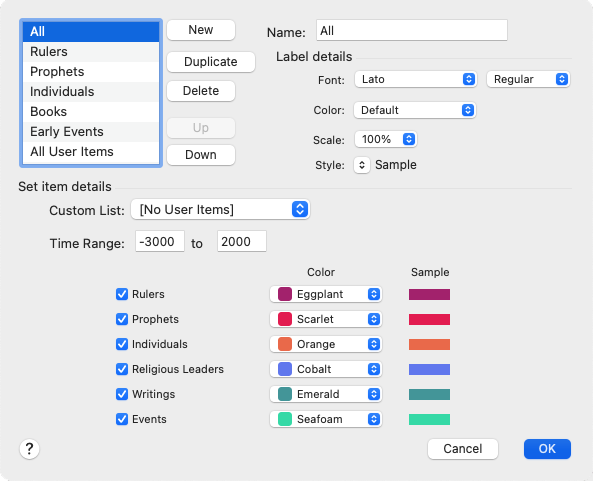
Description: The dialog box has two main areas. The top area lists currently defined Item Layers and is used to edit or create new ones, and rearrange their order on the Items pop-up menu for the Timeline. The bottom area is used to define the items used and how they are displayed.
Open the Define Item Layers Dialog BoxOpen the Define Item Layers Dialog Box
Do one of the following:
- From the Items pop-up menu, choose Define Item Layers.
- On the Display menu, choose Define Time Layers>Item Layers.
Define an Item Layer (Overview)Define an Item Layer (Overview)
- Open the Define Item Layers dialog box.
- Click New to create a new item layer. [New name] is added to the list and the Name box.
To remove the new layer click Delete. - In the Name box, enter a name for the layer.
- Use the Label Details items to set the appearance of the Item Layer.
- In the Set item details area, choose the items to display, and how they will appear.
- Click OK. The new/edited layer is displayed on the Timeline (if the Timeline tab is the active tab).
Use Duplicate to create another layer with the same settings as the previous layer, and then change some of the settings.
Example: You can set display of the markers for all classes of items, then duplicate the layer and hide some classes, or use a Custom List without having to reset all the display options.
Options in the Define Region Layers Dialog BoxOptions in the Define Region Layers Dialog Box
List of Item Layers (Top Left): Displays any Item layers already defined for use with the Timeline. The layer last used when this dialog box was closed is selected when the dialog box is reopened. Click a layer name to display its current settings in the dialog box. You can then edit the settings for that layer.
List Buttons: Used to arrange the names in the list and on the Items pop-up menu.
- New: Adds "new name" to the list and in the Name box.
- Duplicate: Creates a duplicate of the selected Item Layer. The duplicate layer is automatically given the same name, followed by a number (for example XXX.1 and XXX.2 for the same layer duplicated twice). You can rename the layer via the Name box.
- Delete: Removes the selected name from the list and from the Regions pop-up menu.
- Up and Down Buttons: Click to move the selected Region Layer up or down the list.
Name Box: Used to enter or modify the Item Layer name. Adding spaces before the name will indent it on the pop-up menu.
Label details area: Use the pop-up menus in this area to define the appearance of all labels on this layer.
- Font: Choose from fonts available on your system.
- Color: Choose from a range of colors.
- Scale: Sets the sizes of these names relative to the other item names on the Timeline.
- Style: Offers standard font styles. The word Sample is displayed in the style currently selected.
Set Item Details Area: The options here are used to define which items to include in the layer.
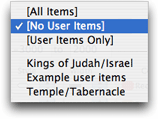
 Custom List Pop-up Menu: Used to choose which set of items will be included in the layer. Available options are:
- [All Items]: Uses all items currently defined for the Timeline.
- [No User Items] (default): Uses the standard list of items supplied with the Timeline.
- [User Items Only]: Uses only the user items which you have created.
- Custom Lists (if created): Uses the items in the selected custom list.
- Time Range boxes: Used to enter the time period to be displayed. The maximum range limits are -3000 (left box) to 2000 (right box). All items, including political periods and User Items, are displayed only if they fall within the set range.
- Class Items: Used to include up to five classes of items on each layer. Available classes are:
- Rulers: Includes the reigns of kings, judges, pharaohs, and emperors, etc.
- Prophets: Includes those who wrote prophetic books, and those like Elijah who did not, and displays their period of activity.
- Individuals: Displays the life span of important people, including rulers.
- Writings: Indicates the probable date of authorship.
- Events: Includes all other kinds of noteworthy historical events.
- You can define a different display marker for each class item. The marker shows the length of time associated with that item, such as the reign of a ruler, or the life of a person.
- Choose the Style, Width, and Color from the pop-up menus.
- If desired, select Shadow to apply a shadow to the marker.
- A preview of the marker is shown in the Sample column (see below).


