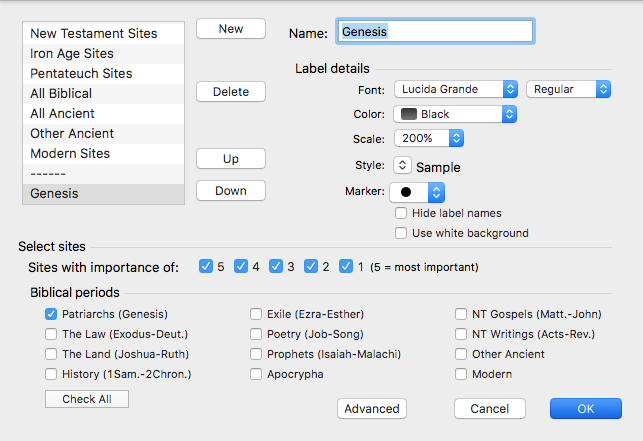
Example: Create a Site Layer for Important Sites Mentioned in One Book of the Bible
Goal: You want to create a Site Layer in a 2D Atlas tab that displays important sites mentioned in one book of the Bible. This example guides you through creating a Site Layer of important sites mentioned in the book of Genesis.
|
|
Note There are a limited number of predefined site layers provided with the Atlas. Examples include "New Testament Sites," "All Biblical Sites," and "Modern Sites." However, if you want a Site Layer that includes all the sites from a particular book in the Bible you must create it yourself. |
- Create a Custom Site Layer by doing the following:
- Open a 2D Atlas tab. An Atlas tab can be opened via the Library, the File menu, or the Workspace toolbar.
- Select Define Site Layers from the Site Layers pop-up menu. The Define Site Layers dialog box appears.
- Click New at the top of the Define Site Layers dialog box. [New Name] appears in the Name field of the Site Layers dialog box.
- Type Genesis in the Name field of the Site Layers dialog box. Genesis is displayed in the Name field.
- Customize your Custom Site Layer by selecting label details and site information:
- To customize the appearance of site labels, change the relevant settings in the Label details area.
|
|
Note The size of the font used to display the name of the sites is determined by the relative importance of the site and cannot be changed. |
- A range of sites, based on importance, can be selected in the Select Sites area of the dialog box. To display every site, select sites 1-5.
-
Select Patriarchs (Genesis) from the Biblical periods area of the Define Site Layers dialog box. Only sites mentioned in Genesis are added to your site layer.
- Click OK to save the new custom layer. Your new custom layer appears in the Site Layers pop-up menu.
